Glass to Ceramic: A Glass Vase Makeover
- Mar 18, 2025
- 2 min read
Updated: Mar 18, 2025
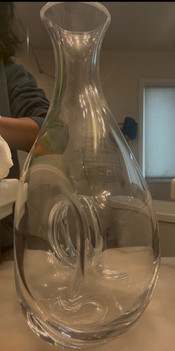
If you’ve been following my DIY journey, you know I love transforming thrifted finds into stylish home decor pieces. This time, I found a plain glass flower vase at Goodwill, and I couldn’t resist giving it a luxurious makeover. The goal was to create a modern ceramic look with some unique textural details, and I’m thrilled with how it turned out! Here’s how I gave this vase a whole new life.
Step 1: Clean and Prep Your Vase
Before diving into the makeover, I made sure to thoroughly clean the vase. I wiped it down to remove any dust and fingerprints, so the paint would adhere properly. A clean surface is key for a smooth finish!
Step 2: Add Texture with Spackling Compound
Next, I applied a layer of spackling compound all over the vase. This step is crucial for achieving the ceramic look. The compound creates a rough texture, making the vase feel more like a high-end decor piece. I used a spatula to evenly spread the compound, focusing on creating a consistent, textured finish. After covering the entire vase, I let it dry completely before moving on.
Step 3: Mix Paint with Baking Soda for a Textured Effect
Once the spackling was dry, it was time to paint. To add even more texture, I mixed some baking soda into my paint—this makes the paint thicker and gives it a slightly gritty finish. I started by painting the bottom of the vase with a fresh, clean white, and then transitioned to a soft, muted green-gray at the top. I let each layer dry before moving on to the next.
Step 4: Add Silver Leafing for a Luxe Touch
When the paint was dry, I couldn’t resist adding a little sparkle! I applied silver leafing where the white and green-gray colors meet. This small detail elevates the entire vase, giving it that luxe, high-end look I love. The silver leafing adds just the right amount of metallic contrast to the matte finish of the paint.
Step 5: Seal It All with Polyurethane
To protect my hard work and give the vase a polished finish, I added a coat of polyurethane. This clear finish helps seal the paint and texture, while giving the vase a subtle shine. It also ensures that the vase is durable and can withstand everyday use.
Step 6: Let It Dry and Display!
After everything dried completely, my chic, textured glass vase was ready for display. It’s the perfect addition to any room and a great conversation piece! The combination of white, muted green-gray, and silver makes it both modern and timeless, with just the right amount of elegance.
This vase makeover was such a fun project, and it proves that with a little creativity and the right materials, you can turn even the simplest thrift store finds into something special. Have you ever tried a similar project? I’d love to hear about your DIY adventures in the comments!


Behind the Magic:
Plain glass vase (mine was about 1 foot tall with a donut-type hole in the middle - a goodwill find)
Spackling compound
Baking soda
White and muted green-gray paint
Silver leafing - Amazon
Polyurethane finish

Comments